What Are The Two Gauges On My Air Compressor?
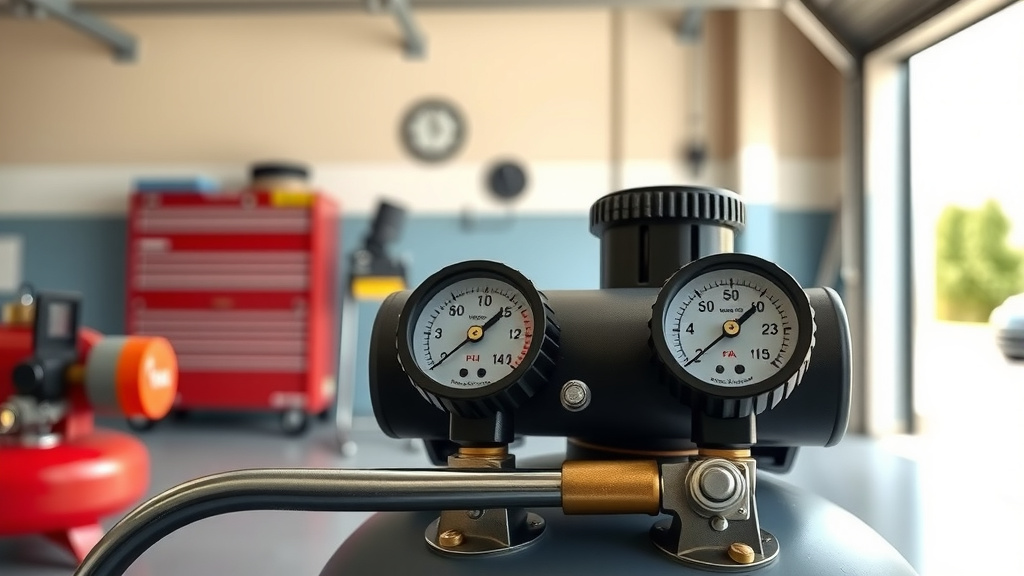
The two gauges on your air compressor typically show the internal tank pressure and the regulated air pressure being sent to your tools.
One gauge monitors the air stored inside the tank, while the other lets you adjust and monitor the pressure going out to your air tools.
- Your air compressor has two important gauges: one for the internal tank pressure, and one for the output pressure.
- The tank gauge tells you how much air is stored, while the output gauge controls what pressure your tools receive.
- Understanding both helps you operate your compressor safely and effectively for any job.
- Always check both gauges before you begin working to ensure correct settings.
Ever looked at your air compressor and wondered about those two dials staring back at you? Don’t worry, you’re not alone! Many people feel a bit puzzled by them. But here’s a secret: those two gauges are your best friends when it comes to safely and effectively using your air tools. They give you all the vital information you need to keep things running smoothly. Think of them as the speedometer and fuel gauge for your compressor setup.
What Are The Two Gauges On My Air Compressor?
Your air compressor features two primary gauges: one indicates the pressure inside the storage tank, and the other displays the adjustable pressure delivered to your air tools.
Gauge One: The Tank Pressure Indicator
This gauge tells you the total amount of compressed air sitting inside your compressor’s tank. It’s like looking at the gas tank in your car. This pressure builds up as the compressor motor runs, filling the tank. You’ll see this needle climb as the compressor works its magic.
We often find that this gauge shows the compressor’s maximum pressure capability. When the tank reaches its set maximum, the compressor motor will typically shut off automatically. This is a normal and important safety feature, preventing over-pressurization.
Gauge Two: The Regulated Output Monitor
Now, this is the gauge that truly connects with your work. It shows the pressure of the air actually leaving the compressor and going into your air tools. You can adjust this pressure using a regulator knob, usually located near this second gauge.
Why adjust it? Because different tools need different pressures! A nail gun might need less pressure than an impact wrench. This gauge lets you fine-tune the output, ensuring your tools work perfectly without damage. Many experts suggest always checking your tool’s manual for its recommended operating pressure before you begin.
Why You Need Both Gauges
You might ask, “Why not just one gauge?” It’s a great question! Having two gauges gives you complete control and critical safety information. The tank gauge lets you know if you have enough stored air for your project.
The output gauge, on the other hand, makes sure you’re not overpowering a delicate tool or underpowering a demanding one. Imagine trying to drive a tiny screw with an industrial drill! The two gauges work together to provide flexibility and protection for your equipment and your work.
Keeping Your Tools Happy
Think of your tools like individual guests at a party, each with their own drink preference. The tank gauge is the “main bar” pressure. The output gauge is the “bartender” adjusting each drink to perfection. This ensures your nail gun, spray painter, or impact wrench gets the exact air pressure it needs to perform its best and last longer.
Reading Your Air Compressor Gauges Accurately
Reading your gauges is straightforward once you know what to look for. Both gauges usually show pressure in Pounds Per Square Inch (PSI). Some might also include kPa (kilopascals). Always read the number that the needle points to directly.
For the tank gauge, you want to see it build up to the compressor’s maximum rating. For the output gauge, you want to match the PSI recommended by your tool’s manufacturer. This ensures optimal performance and safety. Don’t guess; take a moment to read them.
Setting the Right Output Pressure
To set your output pressure, first ensure the compressor tank is full. Then, find the regulator knob near your output gauge. Turn it clockwise to increase the pressure and counter-clockwise to decrease it. Watch the output gauge as you turn the knob. Make small adjustments until you reach the desired PSI. It’s a bit like tuning a radio.
The Essential Air Compressor Regulator
The regulator is the unsung hero of your air compressor setup. It’s the device that lets you control the output pressure, regardless of the tank pressure. Without it, your tools would receive the full tank pressure, which could be too much for most applications and very unsafe.
We’ve observed that a good regulator maintains a consistent pressure even as tank pressure drops. This consistency is vital for tasks like painting or sanding, where a steady flow of air is paramount for a smooth, even finish. Think of it as a pressure governor.
Understanding Normal Gauge Readings
Knowing what “normal” looks like for your gauges helps you spot problems early. Here’s a quick overview:
| Gauge Type | Normal Behavior |
|---|---|
| Tank Pressure Gauge | Rises quickly, shuts off at max PSI (e.g., 120-150 PSI), drops slowly with use. |
| Regulated Output Gauge | Stays steady at your set PSI (e.g., 90 PSI) during use, even if tank pressure drops. |
If you see readings outside these typical patterns, it might be time to investigate. Sometimes a little bit of troubleshooting goes a long way. This table gives you a quick reference point.
Troubleshooting Common Gauge Issues
Gauges generally work without fuss, but sometimes they act up. Here are some quick checks if you notice something odd:
- Is the needle stuck or not moving? It might be a faulty gauge.
- Is the output pressure fluctuating wildly? Your regulator might be failing.
- Does the tank pressure drop too fast? Check for air leaks in hoses or connections.
- Is the gauge broken or cracked? It definitely needs replacing for safety.
- Are both gauges reading zero when the compressor is on? Check the power supply and switch.
These simple steps can often help you identify the problem. Remember, a broken gauge can be a safety risk, so address it promptly. Many sources recommend replacing any gauge that appears damaged or inaccurate.
Prioritizing Air Compressor Safety
Monitoring your gauges is a key part of air compressor safety. Over-pressurization can be extremely dangerous, leading to tank rupture. Always ensure your gauges are working correctly and never operate a compressor with a faulty pressure relief valve.
Additionally, we found that wearing eye and ear protection is always a good idea when operating air tools (OSHA guidelines). Even simple DIY projects can create loud noises and flying debris. Your safety always comes first.
Tips for Gauge Maintenance
Keeping your gauges in top shape is relatively simple. Here are a few tips:
- Keep them clean: Wipe off dust and grime regularly.
- Protect from impact: Avoid dropping tools near them.
- Check for cracks: Inspect for any physical damage.
- Listen for leaks: Hissing sounds near gauges indicate a problem.
- Test accuracy: If unsure, compare with a known accurate gauge.
These small actions help ensure your gauges remain accurate and visible, providing you with reliable pressure readings for years to come.
Conclusion
Understanding the two gauges on your air compressor isn’t just about technical know-how; it’s about making your projects safer, easier, and more successful. The tank pressure gauge tells you what’s stored, while the regulated output gauge gives you the power to perfectly match the air pressure to your tools. By paying attention to these crucial indicators, you’ll gain confidence and control, turning potential confusion into smooth, efficient operation. Keep those gauges in mind, and happy compressing!
FAQ: What PSI Should My Air Compressor Be Set To?
The ideal PSI setting for your air compressor output depends entirely on the air tool you are using. Always check the manufacturer’s recommendations for your specific tool, usually found in the user manual. Most air tools operate best between 70-90 PSI, but some larger tools might require more.
FAQ: Can an Air Compressor Work with Only One Gauge?
Technically, an air compressor could operate with just a tank pressure gauge, but it wouldn’t be safe or practical for most tasks. Without the regulated output gauge and its corresponding regulator, your tools would receive the full, uncontrolled tank pressure, which could damage them or cause unsafe operation.
FAQ: How Can I Tell if My Regulator is Failing?
Signs of a failing regulator include unstable or fluctuating output pressure, even with a steady tank pressure. You might also notice that you can’t adjust the output pressure, or it leaks air constantly. If you suspect a faulty regulator, it’s best to replace it.
FAQ: Is Pressure Fluctuation Normal for Air Compressors?
It’s normal for the tank pressure gauge to fluctuate as the compressor cycles on and off, building and then using air. However, the regulated output pressure gauge should remain fairly stable at your set PSI while using a tool. Significant fluctuations in output pressure suggest an issue, often with the regulator.
FAQ: What is the Difference Between PSI and CFM for Air Tools?
PSI (Pounds Per Square Inch) measures the force or pressure of the air. CFM (Cubic Feet Per Minute) measures the volume or flow rate of the air. Both are important for air tools: PSI tells you how hard the air pushes, while CFM tells you how much air the tool needs to operate continuously. Some tools need high pressure, others high volume, and many need both.