How To Transport An Air Compressor?
To safely transport an air compressor, always drain all fluids, secure movable parts, and keep the unit upright to prevent damage or spills. Proper preparation is key for a smooth move.
You can move an air compressor by first disconnecting power and air lines, then carefully lifting and securing it in a stable position within your vehicle. Consider its size and weight.
- To move your air compressor, always start by unplugging it and releasing any air pressure.
- Next, drain the air tank of all moisture and any oil from the crankcase if it’s an oil-lubricated model.
- Secure loose hoses and cords to prevent them from snagging or getting damaged during transit.
- Carefully lift the compressor, preferably with assistance, and keep it upright in your vehicle.
- Always tie it down firmly to stop it from shifting or tipping over while you drive.
How To Transport An Air Compressor?
Transporting an air compressor requires careful steps to ensure safety and prevent equipment damage. You need to plan based on your compressor’s size and type. It’s like moving any heavy appliance; preparation makes all the difference.
Why Proper Compressor Transport Matters
Moving an air compressor might seem simple, but rushing it can cause serious problems. An improperly moved unit can suffer internal damage. It also poses a safety risk for you and anyone helping.
Imagine a bowling ball rolling freely in your car – that’s what a loose compressor can become. We found that preventing oil leaks or tank damage protects your investment. Your air compressor is a valuable tool; treat it with care during transit.
Understanding Your Compressor Type
Before you even think about lifting, consider what kind of compressor you have. Is it a small, portable hot-dog style? Or a much larger, stationary tank model? Different types require different approaches (OSHA guidelines often highlight this).
Portable units usually have wheels and handles, making them easier. Larger, industrial units might need special lifting equipment. Knowing your compressor’s weight and dimensions helps you plan the right strategy.
Essential Preparations Before Moving
Preparation is the bedrock of successful air compressor transport. Think of it like packing for a long trip. You wouldn’t just throw everything in; you’d organize it. Your compressor needs similar attention before hitting the road.
Safety First: Always!
Your personal safety comes before anything else. Before touching the compressor, disconnect it from power sources. Many experts say that wearing gloves and closed-toe shoes protects against pinches or dropped items.
Always assess the weight. If it feels too heavy, get help. Never strain your back trying to lift a unit alone. We recommend using a dolly or hand truck for anything more than a small, lightweight model.
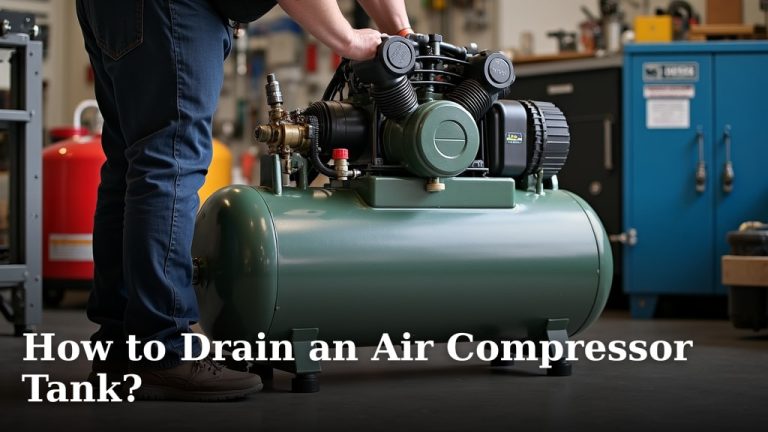
Draining Fluids: A Critical Step
This is where many people make mistakes. Air compressors contain both condensation (water) and sometimes oil. You must drain these fluids completely before moving. Water inside the tank causes rust, and oil can leak (National Institute for Occupational Safety and Health).
First, open the drain valve at the bottom of the air tank to release condensed water. Next, if you have an oil-lubricated compressor, drain the oil from the crankcase. We found that consulting your owner’s manual for specific instructions is always a good idea.
Securing Hoses and Cords
Loose hoses and power cords are like trip hazards waiting to happen. Before moving, coil them neatly and secure them. You can use zip ties or bungee cords for this. Keeping them tidy prevents damage.
Imagine a loose hose getting caught under a wheel or caught on something in your vehicle. This simple step saves you from potential repairs down the line. It’s a small effort with big payoff.
Lifting and Loading Techniques
Once your compressor is drained and prepped, it’s time to lift it. This step needs care and proper technique. Don’t rush this part. Your back will thank you later.
Small Portable Units: Easier to Handle
For smaller compressors, you might be able to lift them by hand. Bend your knees, keep your back straight, and lift with your legs. If it has wheels, use them! Roll it onto a ramp or tilt it gently into your vehicle. Always try to keep the compressor upright.
Larger Stationary Units: Calling for Help
If your compressor is too heavy for one or two people, don’t be a hero. A furniture dolly, forklift, or even a professional moving service is a better option. We found that forcing a heavy lift often leads to injuries or equipment damage. Think smart, not just strong.
Securing the Compressor for Transit
Once loaded, your air compressor needs to be rock-solid. You don’t want it sliding around as you drive. This is crucial for safety and preventing damage. Secure it like precious cargo.
| Method | Pros | Cons |
|---|---|---|
| Ratchet Straps | Very strong, excellent stability, adjustable tension. | Can over-tighten, may require multiple anchor points. |
| Bungee Cords | Quick and easy, good for light items or secondary securing. | Less secure for heavy loads, can snap if overstretched. |
| Wood Blocks/Bracing | Provides a solid, unmoving base, custom fit. | Requires tools, can be time-consuming to set up. |
Use sturdy ratchet straps that hook into solid anchor points in your vehicle. Cinch them down tightly, ensuring the compressor cannot tip or shift. Always keep the compressor in its upright position during transport.
Protecting Against Bumps and Scratches
Even when secured, vibrations and minor bumps can occur. Place old blankets or moving pads around the compressor. This cushioning helps protect its finish and sensitive components. Think of it as giving your compressor a cozy travel blanket.
During Transit: Keeping an Eye Out
Once you’re on the road, drive carefully. Avoid sudden stops or sharp turns. Remember that you have a heavy, potentially top-heavy item in tow. A smooth ride is critical for a safe arrival. Many guidelines point to driving defensively as a good first step (AAA recommends this for any cargo).
What to Do If You’re Moving Long Distance
For longer journeys, plan your route and consider breaks. You might want to stop periodically to check the straps. Over hundreds of miles, vibrations can sometimes loosen things up. A quick check gives you peace of mind.
Unloading and Setup at the New Location
You made it! Now, the unloading process is essentially the reverse of loading. Take your time, and if it’s heavy, get help again. Don’t rush the final steps. After it’s safely in place, you’ll need to prepare it for use again.
Here’s a quick checklist for after transport:
- Inspect for any visible damage or leaks.
- Check all connections and fittings for tightness.
- Refill oil to the correct level (if oil-lubricated).
- Connect power and air lines securely.
- Perform a test run to ensure proper function.
Conclusion
Transporting an air compressor doesn’t have to be a daunting task. By following these clear steps, you ensure both your safety and the longevity of your equipment. From careful preparation and draining fluids to secure loading and thoughtful driving, each stage plays a vital role. Remember, a little extra care upfront saves you a lot of trouble later on. You’re now equipped to move your compressor with confidence, ready for its next job.
Can I transport an air compressor horizontally?
No, you should avoid transporting an air compressor horizontally, especially oil-lubricated models. Laying it down can cause oil to leak into other components, potentially damaging the motor or air lines. Always strive to keep it upright.
Do I need to release all air pressure before moving my compressor?
Absolutely, yes. Before any movement, always release all remaining air pressure from the tank. This is a critical safety step to prevent accidental discharge or potential rupture if the tank is compromised during transit.
What tools are essential for securing an air compressor in a vehicle?
The most essential tools for securing an air compressor are heavy-duty ratchet straps. You might also find a furniture dolly, moving blankets, and sturdy wood blocks helpful for larger units to provide extra stability and padding.
How do I prepare an oil-free air compressor for transport?
For an oil-free air compressor, the primary preparation involves draining all condensed water from the tank. You won’t need to drain oil. Then, disconnect power, secure hoses, and ensure it’s positioned upright and strapped down securely.
Should I disconnect the air hose and accessories before moving?
Yes, it’s always best practice to disconnect any attached air hoses, pneumatic tools, and other accessories. This prevents them from snagging, getting damaged, or becoming hazards during the lifting and transport process. Store them separately and securely.